


For the last few days, and since Adobe Lightroom CC has been released, I have seen a lot of debates going on among the HDR Photography fans. Tens of opinions and conclusions were released in trials that either support or even be against the HDR merge in Adobe Lightroom CC and many comparisons have been made with Photomatix and even other softwares. As an HDR enthusiast, or may be a little more, I have decided to share my perspective in the differences & pros / cons of the HDR processing in Lightroom CC vs Photomatix Pro. However, if you are looking for a decision which of these softwares to use, then it’s not here. Simply, because I will keep using both of them getting the advantages of both ways and mixing them in Photoshop. To have a consistent deep look, I will analyse the performance of the two programs in categories and will also use sample photos to visually compare the differences between the two programs.
فى الأيام القليلة الماضية، وبعد إصدار النسخة الجديدة من برنامج لايت روم سي سي، لاحظت وجود الكثير من النقاشات والجدل ما بين المصورين و محبى التصوير المهتمين بتقنية HDR. عشرات الآراء والاستنتاجات تخرج من هنا وهناك فى محاولة لدعم أو الوقوف ضد خاصية الدمج HDR الجديدة التى أصبحت متاحة فى لايت روم للمرة الأولى. وأيضا العديد من المقارنات جرت بين الصور الناتجة من هذا البرنامج والصور الناتجة من برنامج فوتوماتيكس الشهير. وبم أننى كثيراً ما أستخدم تقنية HDR فى صورى، فقد قررت تجربة خاصية HDR الجديدة فقط بعد ساعات قليلة من إصدار البرنامج. فى هذا المقال سأستعرض رؤيتى للفروق و مميزات وعيوب معالجة صور HDR بكلا البرنامجين، لايت روم سي سي وفوتوماتيكس. ولكن إذا كنت تبحث عن اتخاذ قرار حول اي البرنامجين لتوقف استخدام البرنامج الآخر، فلن تجد الإجابة هنا. وهذا لأن قراري النهائي بعد التجربة كان الإبقاء على كلا البرنامجين واستغلال ميزات كلاً منهما، ودمج الصور الناتجة منهما لاحقا ببرنامج فوتوشوب. للقيام بمراجعة متعمقة، سأقوم بتحليل أداء البرنامجين من عدة جهات وسأستخدم أيضاً صور توضيحية للمقارنة بينهما.
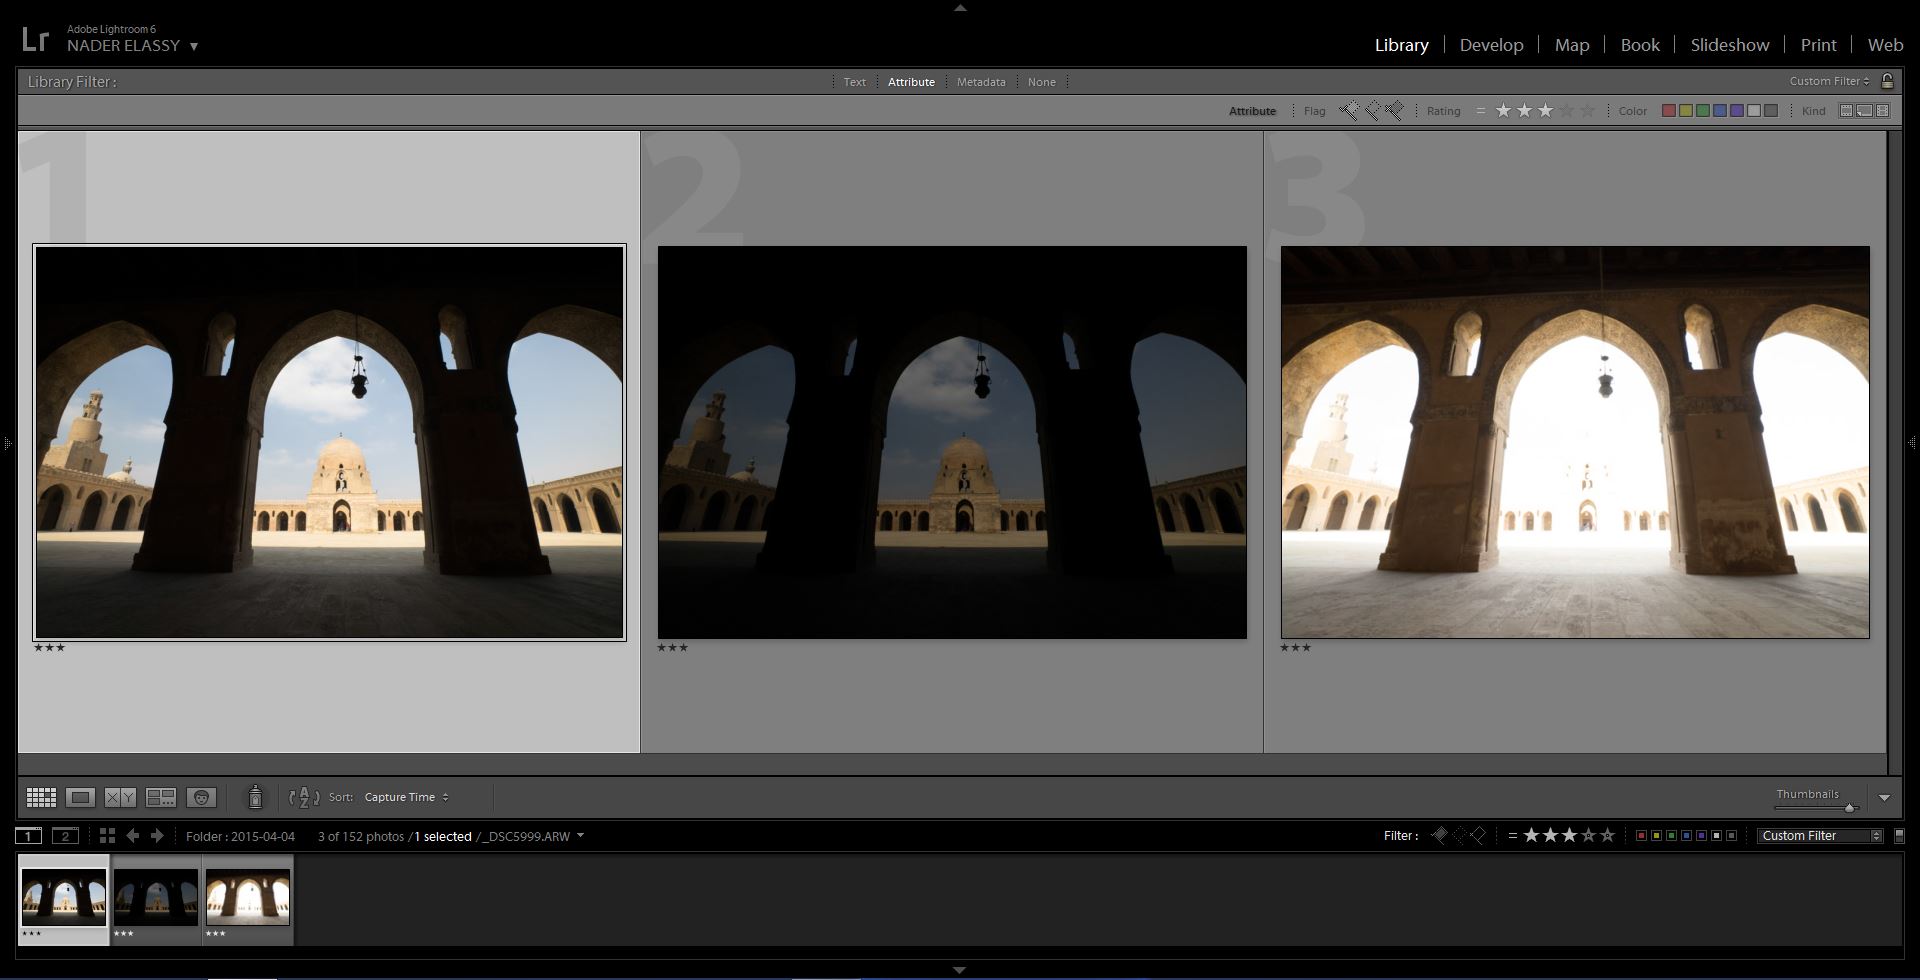
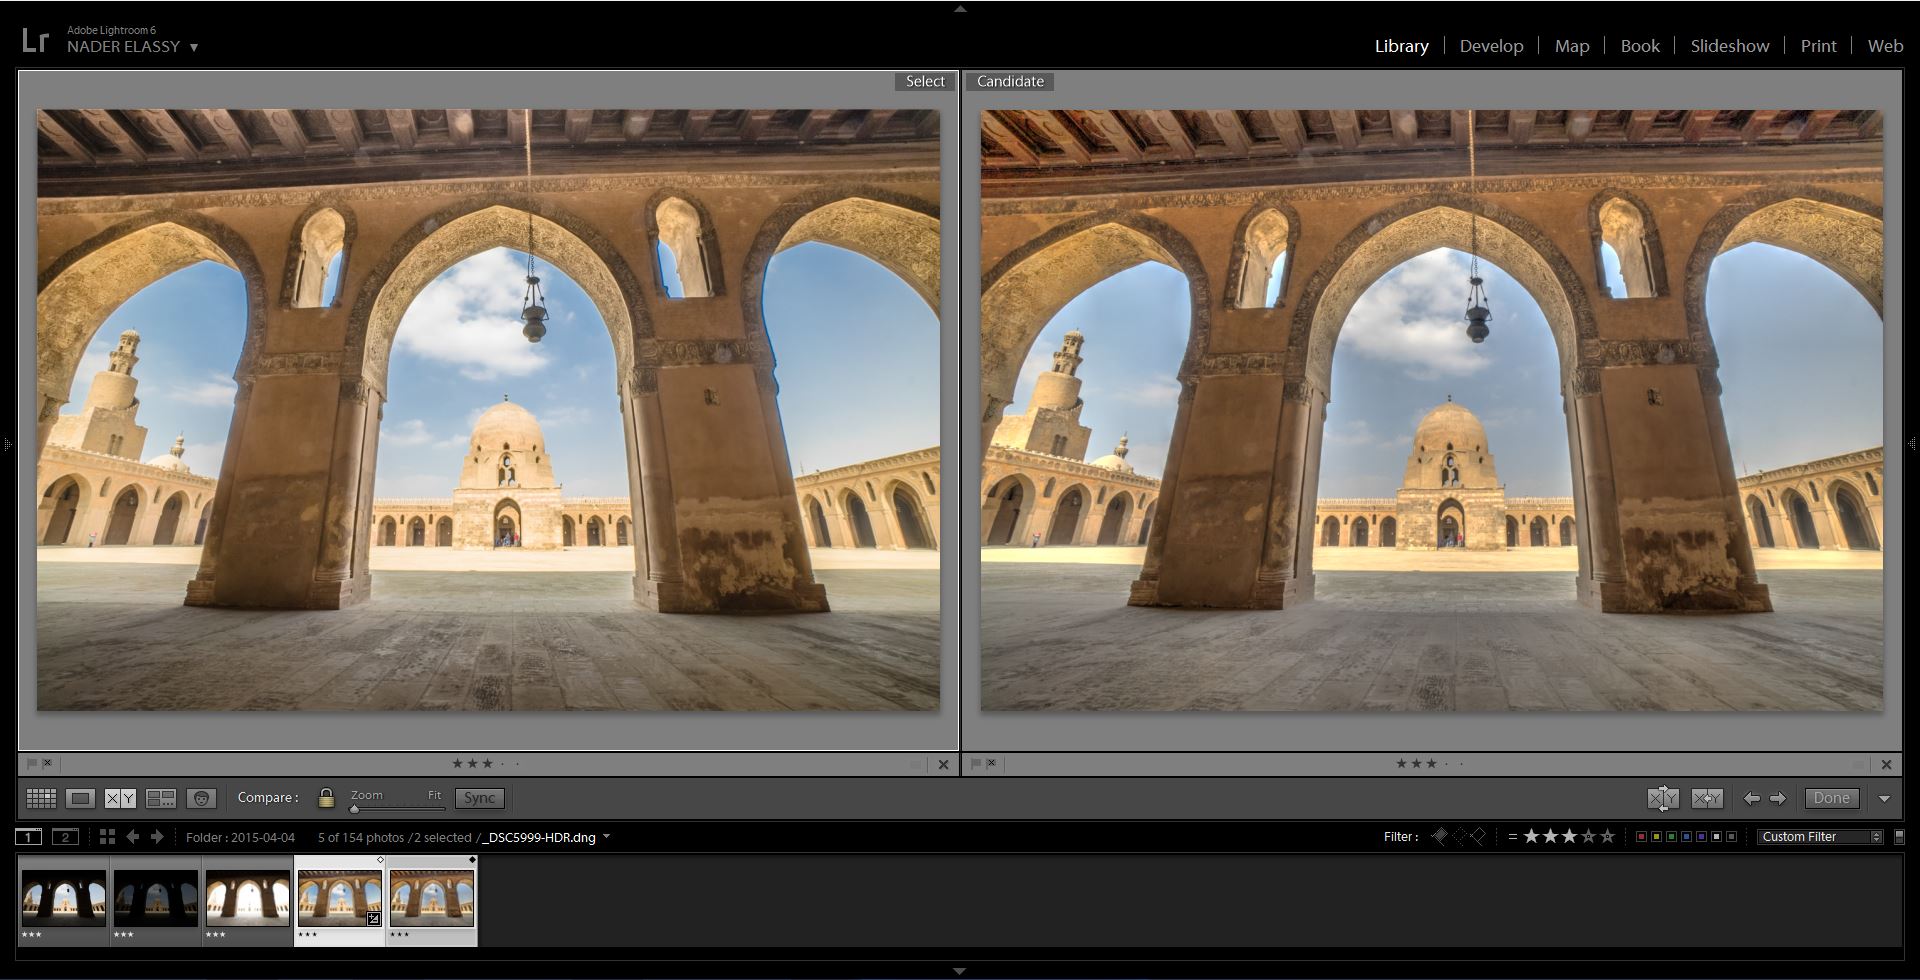
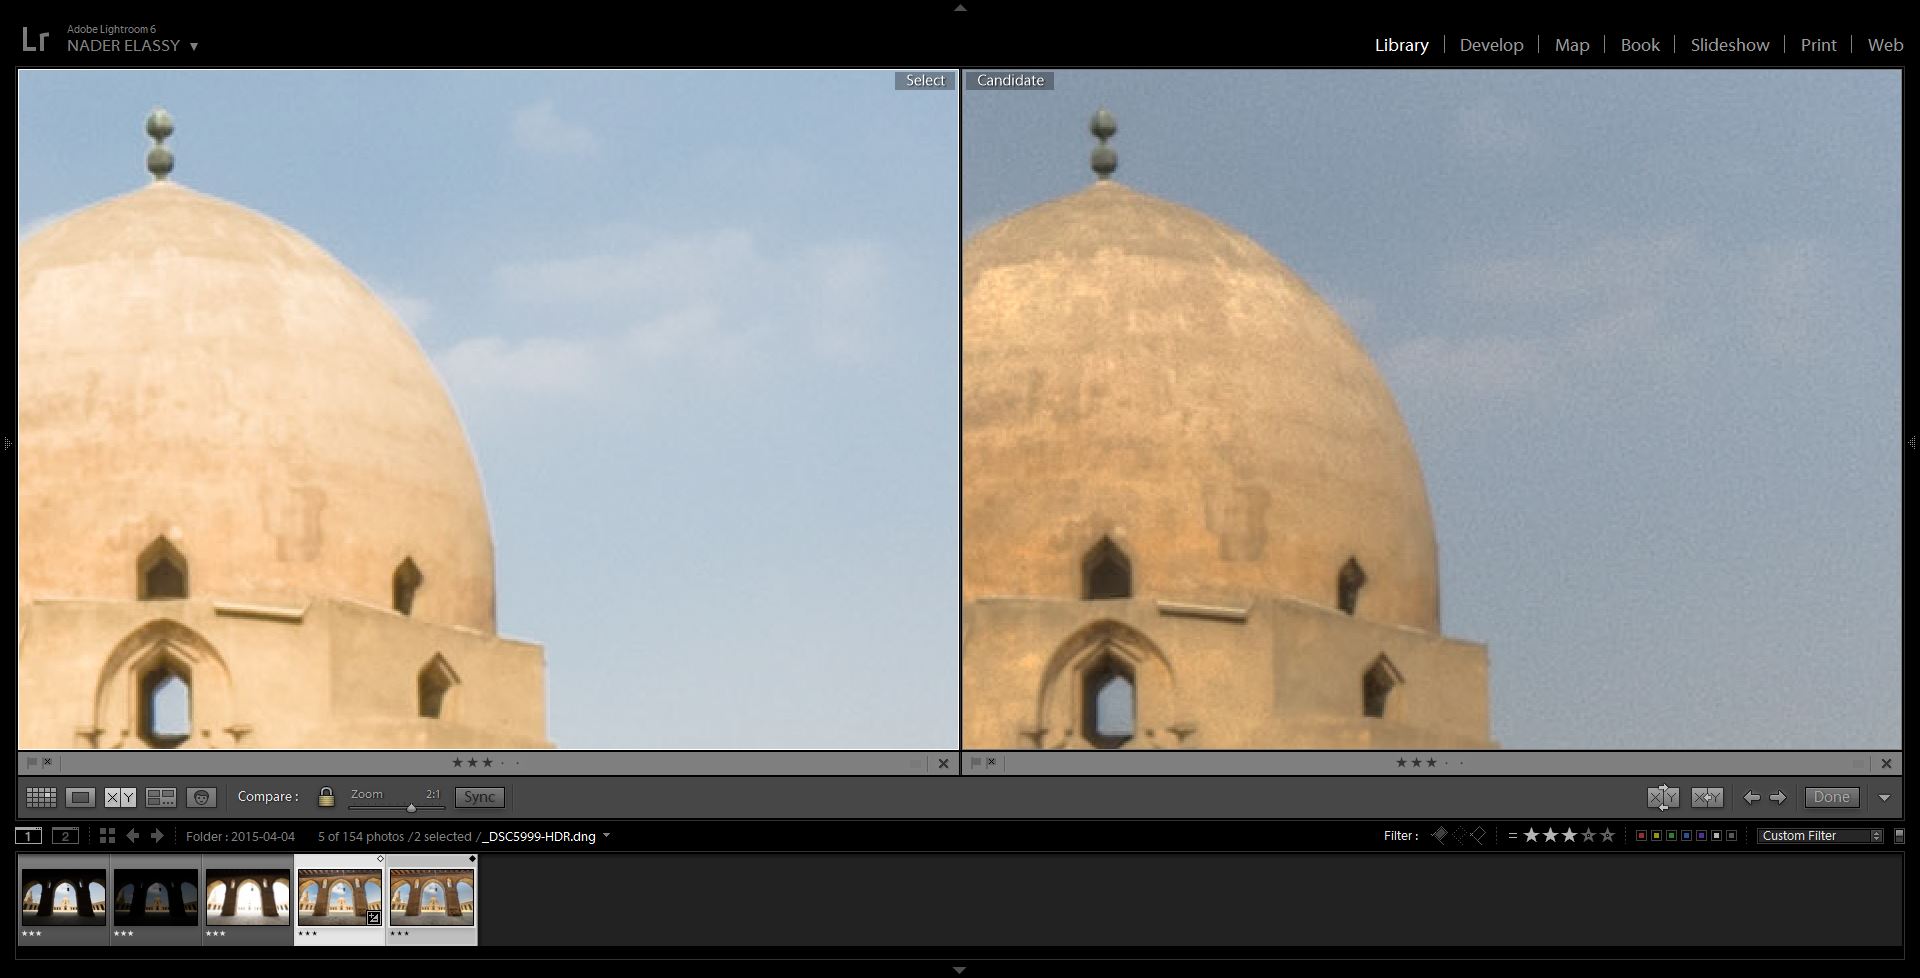
I have used the above 3 bracketed exposures to produce two HDR versions. Results shown below in the left side were produced using Lightroom HDR merge, while the right side results were produced using Photomatix Pro.
استخدمت فى هذه التجربة الثلاث صور المتتالية الظاهرة بالأعلى لإنتاج إصدارين HDR. النتائج التالية التى تظهر على اليسار تمت معالجتها ببرنامج لايت روم، بينما النتائج التى تظهر على اليمين تمت معالجتها باستخدام برنامج فوتوماتيكس.
1. HDR File Format, Size and Processing Speed
The two programs don’t produce the same type of files. Photomatix Pro produces a relatively large sized TIFF file, while Lightroom CC produces a considerably smaller DNG file. So, does that mean that Photomatix is slower than Lightroom? Actually NO. Photomatix Pro is a real fast HDR processing machine, although it produces a larger file size. However, if you plan in processing these files in another software, Photoshop for instance, processing the relatively small DNG file will definitely be easier and faster than the large sized TIFF.
1- تنسيق الملفات، مساحتها وسرعة المعالجة
لا ينتج كلا البرنامجين نفس نوع الملفات. فبينما ينتج فوتوماتيكس ملفات بامتداد TIFF كبيرة المساحة نسبيا، فإن لايت روم ينتج ملفات بامتداد DNG ذات مساحة أقل بدرجة ملحوظة. إذاً هل يعنى هذا أن فوتوماتيكس أبطأ من لايت روم؟ فى الحقيقة لا. يعتبر فوتوماتيكس بحق آلة سريعة لمعالجة صور HDR وهذا على الرغم من أن الملفات التى ينتجها أكبر مساحةً. ولكن إذا كنت تنوى معالجة هذه الملفات لاحقاً على برامج أخرى، مثل فوتوشوب على سبيل المثال، فبالطبع معالجة ملفات DNG ذات المساحة الأصغر نسبيا سيكون بالتأكيد اسهل وأسرع من معالجة ملفات TIFF ذات المساحة الأكبر.
2. Visual Effects
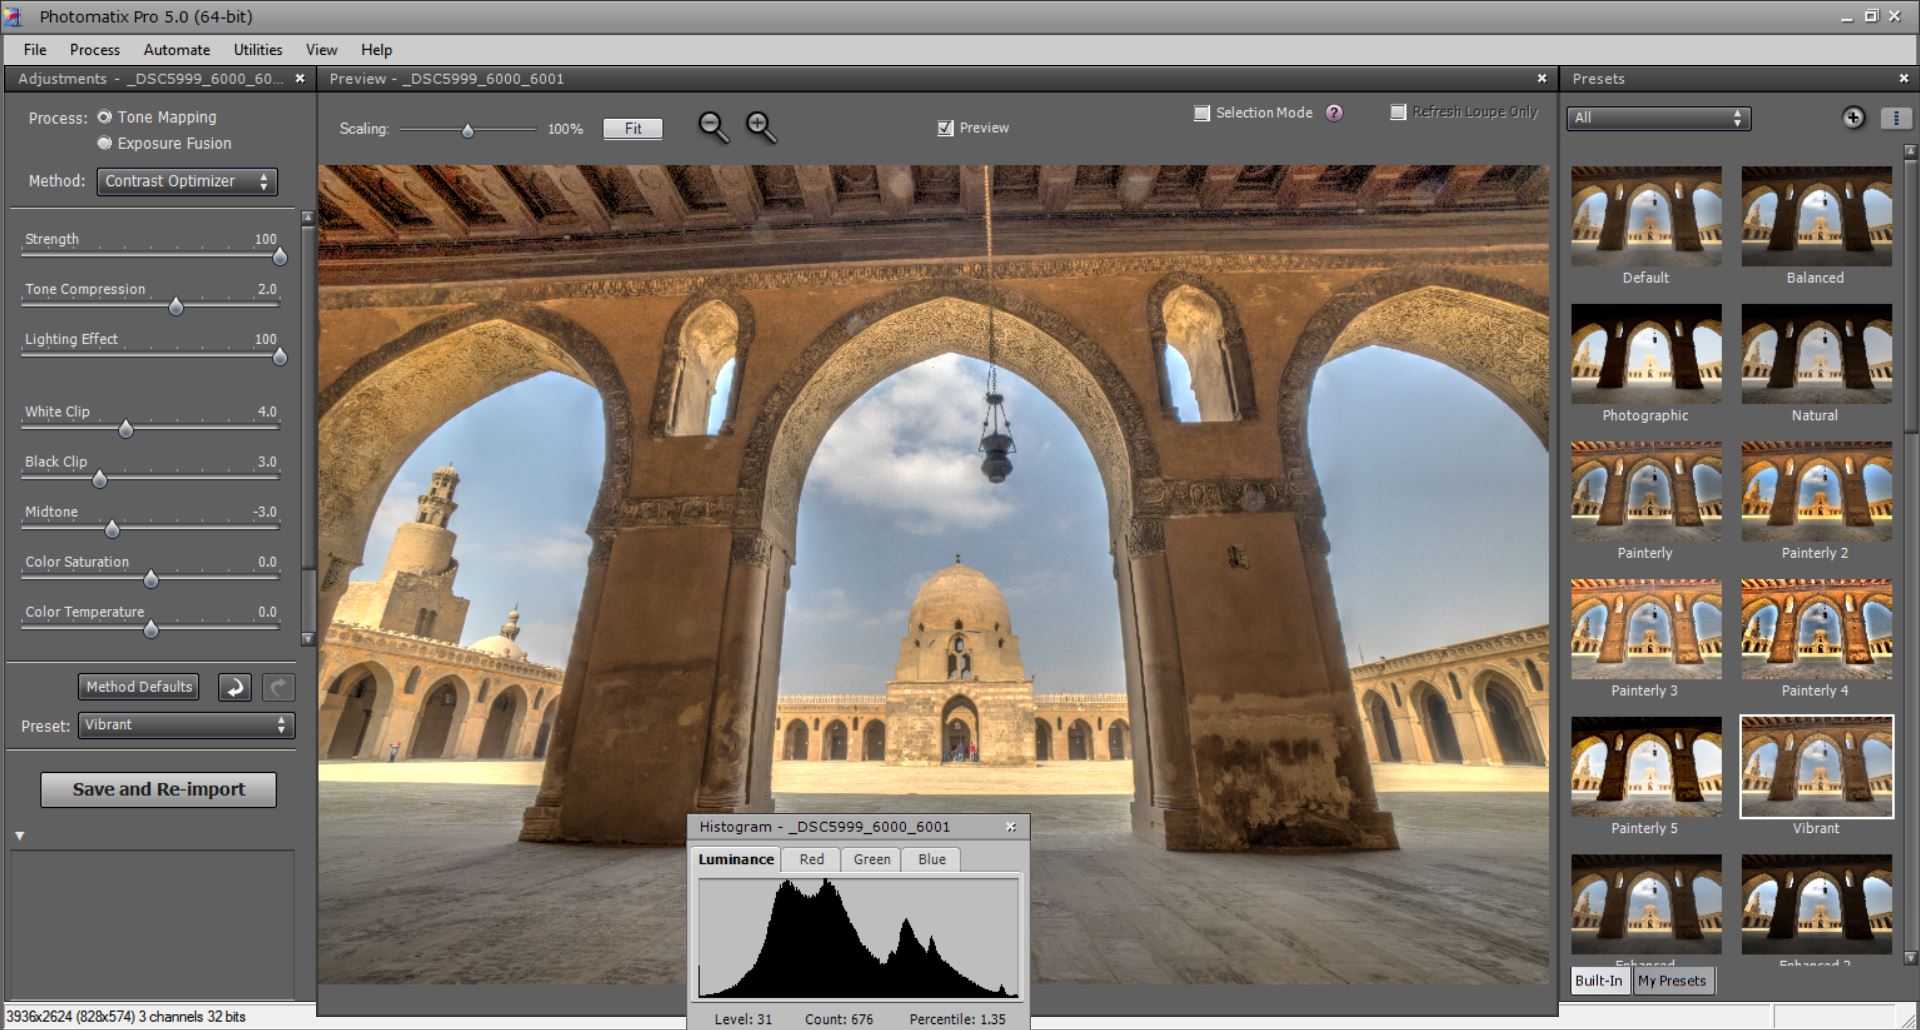
Photomatix Pro always shows a favourable look to the produced HDR images. The nice pre-installed presets gives a good basic start to how the final image can end up. In addition, you still can do your own presets or even get other presets installed.
2- التأثيرات الفنية
دائماً ما يتميز برنامج فوتوماتيكس بإنتاج صور HDR ذات لمسة فنية مرغوبة لدى كثير من المشاهدين. وتعطى الاعدادات المسبقة (presets) الموجودة مع البرنامج بداية فنية جيدة لاظهار كيف سيكون الشكل النهائى للصورة. ويمكنك بالإضافة الى ذلك ان تصنع بنفسك presets خاصة بك او ان تقوم بتنصيب presets سابقة التجهيز.
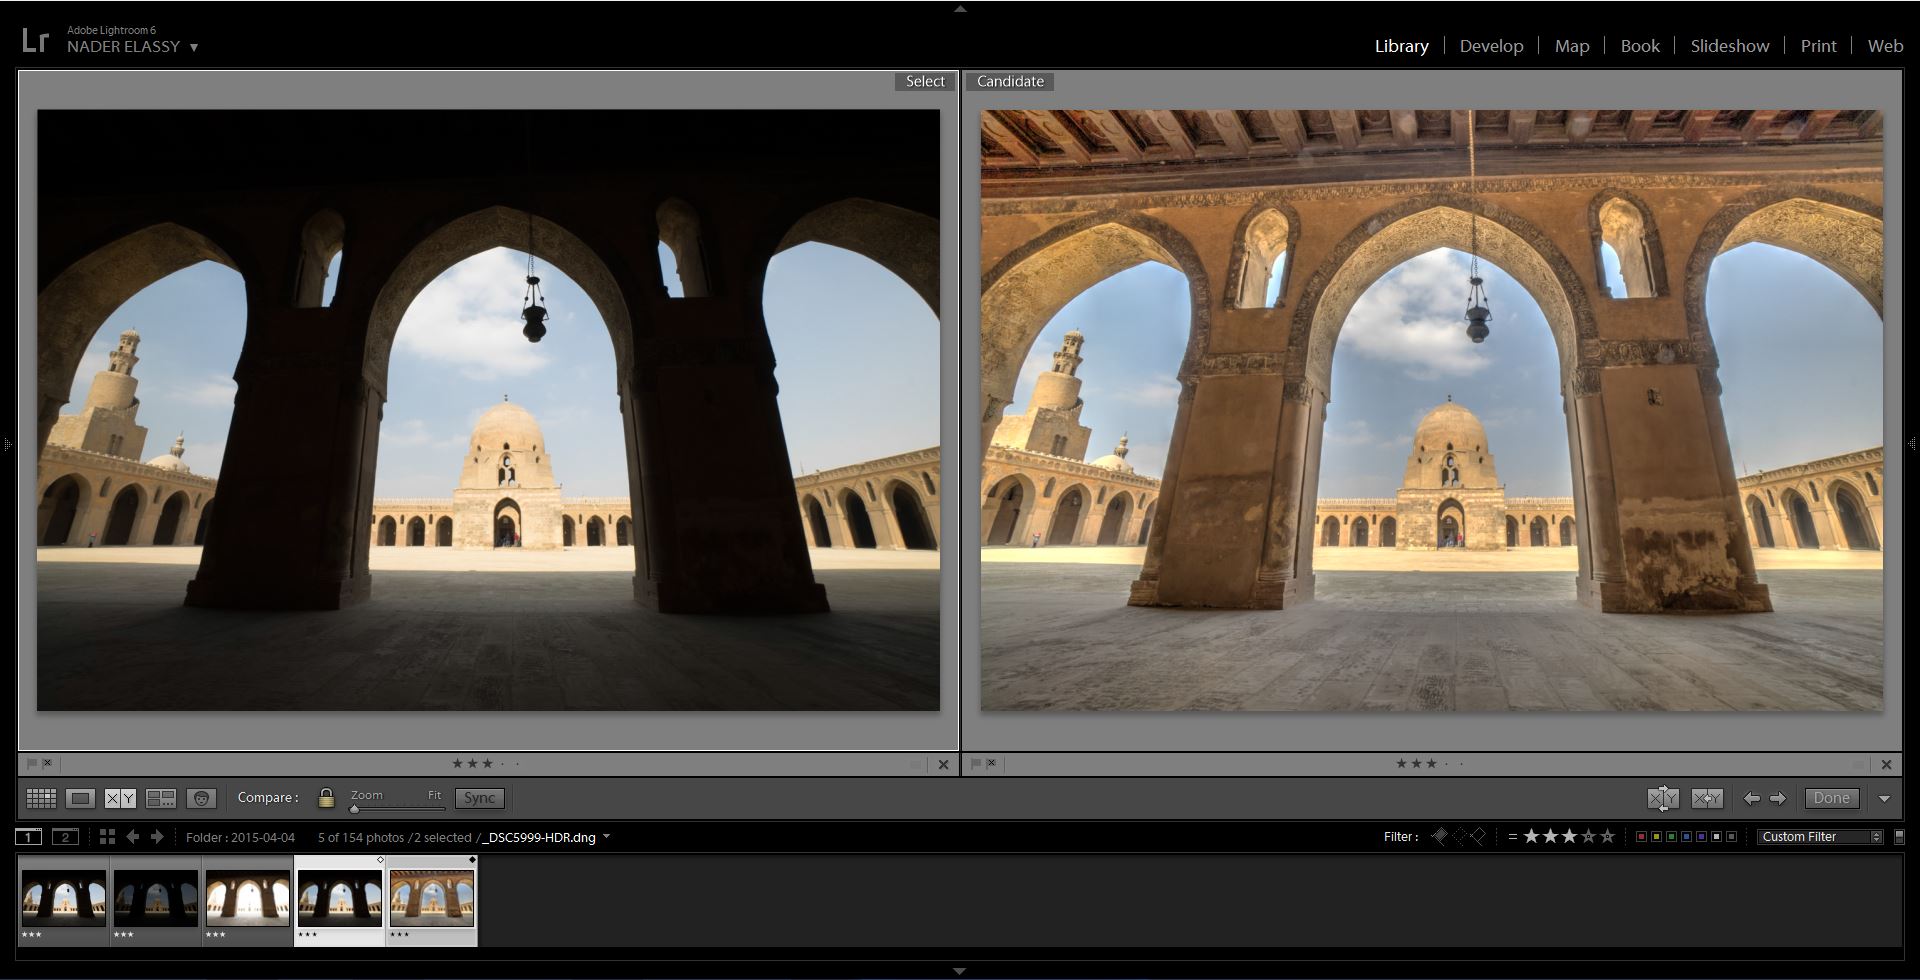
However, Lightroom doesn’t show any visual effects to the processed HDR file. It only merges the exposures and gives you what we call a Super RAW image for processing. There is an option for Lightroom to give you a semi-processed HDR file with shadows lightened and highlights reduced. But that’s only a play around with the sliders. once you Reset the photo, it returns back to the Super RAW state.
أما برنامج لايت روم، فلا يظهر أي تأثيرات فنية فى ملف HDR. يقوم البرنامج فقط بعملية دمج التعرضات منتجاً ملفاً جاهزاً للمعالجة، ونطلق عليه اسم Super RAW. يوجد أحد الخيارات أثناء معالجة HDR فى لايت روم لانتاج صورة شبه معالجة فنياً بتفتيح الظلال وتقليل إضاءة المناطق الساطعة. ولكن كل ما يفعله هذا الاختيار حقيقةً هو تحريك بعض مؤشرات لايت روم، وبمجرد أن تقوم بعمل Reset للصورة، ستعود كما كانت على حالة Super RAW ثانية بدون أي معالجة.
These Visual Effects that Photomatix have given the photographers a great artistic tool to put a favorable touch on the photos. Sometimes I go for a Photomatix version of the photo just to use a certain preset that I love, then I mask the nice areas of the photo in Photoshop into my final image.
ولقد أعطت هذه التأثيرات الفنية لبرنامج فوتوماتيكس للمصورين أداة فنية رائعة لوضع لمسة محببة لدى المشاهد. ففى بعض الأحيان ألجأ لمعالجة نسخة من صورة ما ببرنامج فوتوماتيكس فقط لاستخدام احد الاعدادات presets التى أحبها، ثم أقوم بنسخ المناطق التى أحبها فى هذه النسخة الى الصورة النهائية عن طريق برنامج فوتوشوب.
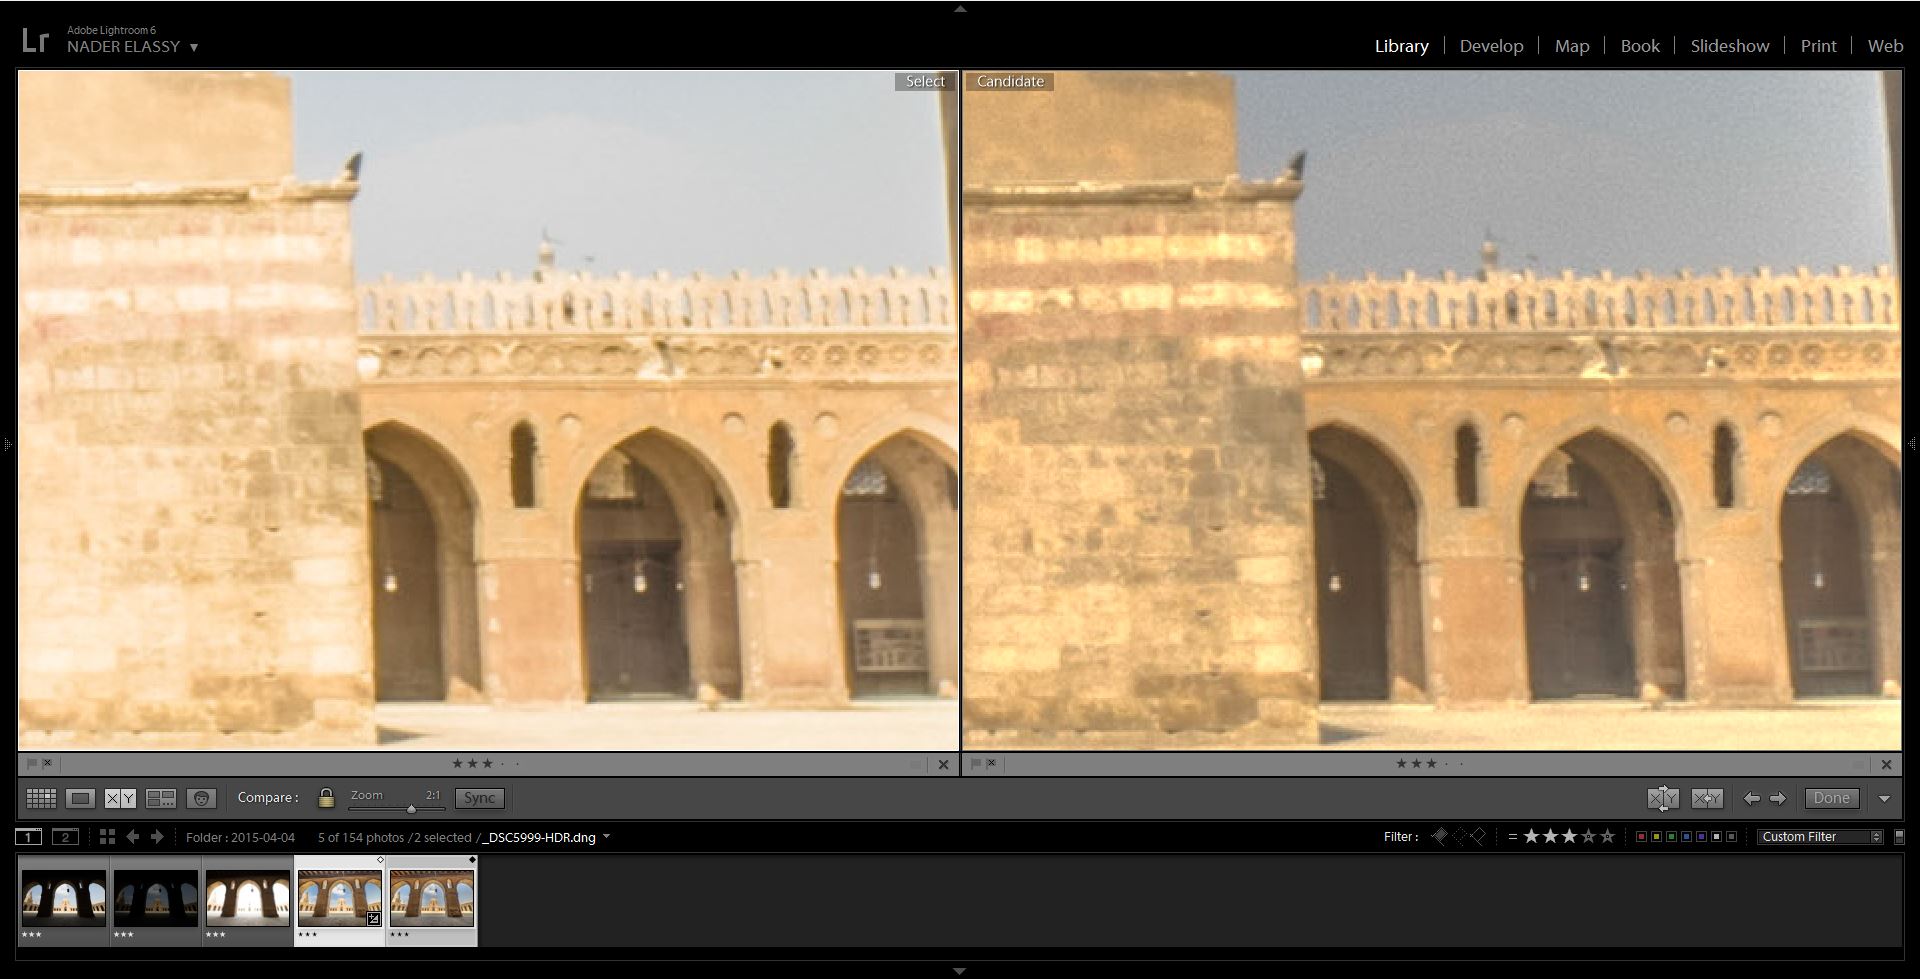
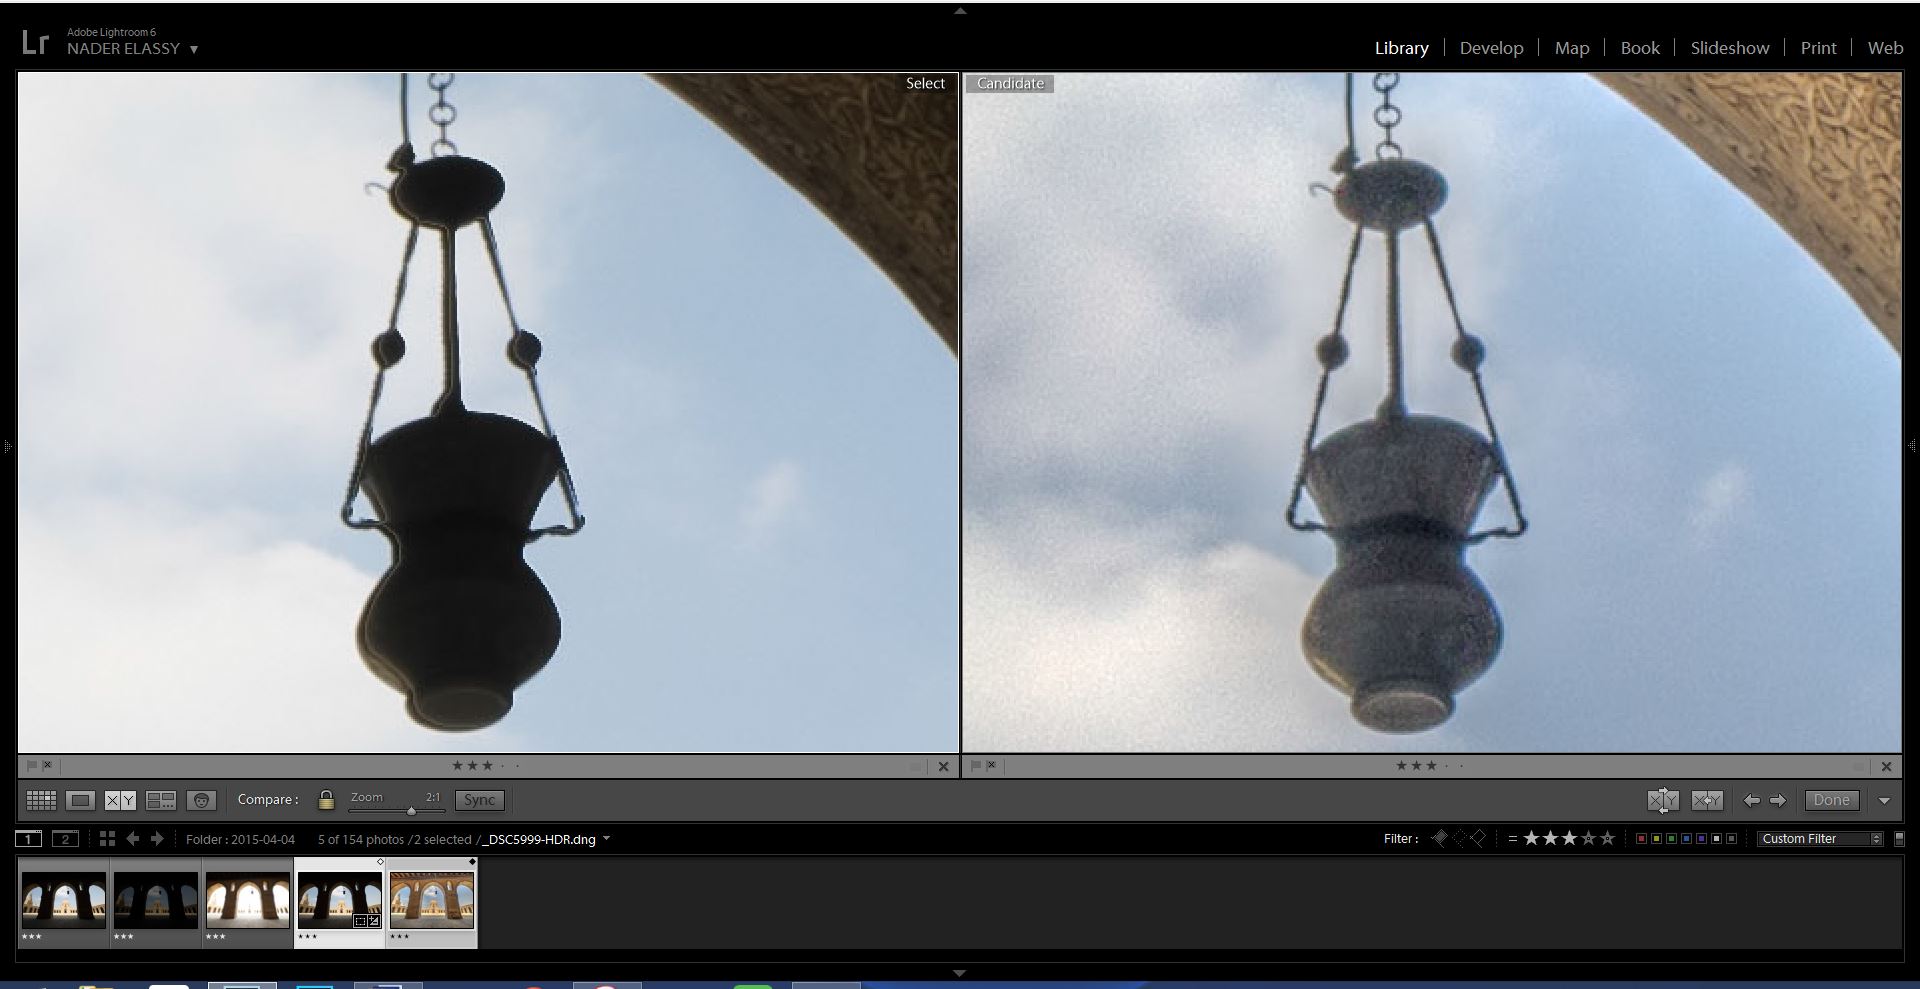
3. Digital Photo Quality
Lightroom HDR merge has usually proven the ability to produce clean images. Compared to Photomatix HDR, Lightroom is way better in this regard. It’s usually evident that extreme noise, over saturation, bright halos etc. are continuous drawbacks in the Photomatix HDR images. From the below photos, noise is a major concern that needs a lot of after processing to deal with. If I have selected a more intense Photomatix processing in this photo, we would see a long list of quality problems here, I just wanted to keep it simple. Honestly, These quality issues are really major to the point a photographer might change the whole processing workflow to avoid.
3- الجودة الرقمية للصور
قد ثبت لى فعليا أن برنامج لايت روم لديه قدرة عالية على إنتاج صور عالية الجودة. مقارنةً ببرنامج فوتوماتيكس، فإن لايت روم أفضل كثيراً فى هذا النطاق. فغالباً ما يظهر فى نتائج برنامج فوتوماتيكس الكثير من Noise وزيادة الألوان بصورة مبالغ فيها بالإضافة للهالات فاتحة اللون حول حواف عناصر الصورة باستمرار. وكما يتضح فى الصورة بالأسفل، فإن Noise تظهر بكثافة وتمثل عيب كبير بصورة فوتوماتيكس، وتحتاج الكثير من المعالجة لاحقاً لإصلاحها. وإذا كنت اخترت Preset أخرى أكثر تأثيراً فى برنامج فوتوماتيكس، لكنا رأينا العديد من المشاكل الأخرى الخاصة بجودة الصورة. وتمثل هذه العيوب عاملاً رئيسياً لتحديد اختيار المصور للبرنامج الذى سيستخدمه.
However, Photomatix Pro excels in other quality areas, like Ghosting. I have tried several examples over the last few months, and I found Photomatix is really smart in understanding and dealing with moving objects in between the bracketed photos. Adobe softwares are not up to that field yet, not even close. But we have to remember that no HDR software is able to handle an originally blurred object, so moving objects has to be originally sharp in all the original photos for the software to handle it.
ولكن على الجانب الآخر، يتميز برنامج فوتوماتيكس فى جوانب أخرى، مثل تكرار الأجسام نتيجة الحركة Ghosting. فلقد قمت بالعديد من التجارب على مدار الشهور الماضية ووانتهيت الى أن برنامج فوتوماتيكس يتعامل بذكاء مع الأجسام المتحركة فيما بين الصور الأصلية ويتعامل معها باحتراف. بينما مازالت برامج شركة أدوبي (فوتوشوب و لايت روم) لا تستطيع التعامل مع هذه المواقف بدقة. ولكن يلزم فى هذا الصدد التنويه ان جميع برامج معالجة HDR لا يمكنها التعامل مع الأجسام المتحركة اذا كانت مهزوزة Blurry فى أحد الصور الأصلية، فلابد أن تكون هذه الاجسام حادة وحركتها مجمدة فى جميع الصور الأصلية حتى يستطيع البرنامج التعام معها.
4. Stand Alone Process?
I would consider Lightroom HDR merge as a possible stand alone HDR software. For the majority of the HDR situations where the lighting variation and objects movements are not extreme, Lightroom can handle the whole processing work producing an acceptably clean and sharp HDR image. However, it’s almost impossible to get a clean final HDR image from Photomatix Pro. I always need to get the quality problems dealt with using another software. Photomatix Pro can’t produce a final clean HDR independently.
4- عملية معالجة قائمة بذاتها؟
يمكننى أن أعتبر عملية دمج صور HDR ببرنامج لايت روم كعملية مستقلة قائمة بذاتها. فى غالبية مواقف تصوير HDR عندما لا يكون الفرق فى إضاءات المشهد غير كبير وفى نفس الوقت لا توجد حركة كثيرة، يستطيع برنامج لايت روم معالجة الصورة بالكامل من دمج وتعديلات اضاءة والوان وغيرها مع إعطاء نتائج مقبولة وشبه خالية من مشكلات ضعف الجودة. بينما يعتبر هذا مستحيلاً عند استخدام برنامج فوتوماتيكس، فالنتيجة النهائية يظهر بها عيوب كثيرة لابد من معالجتها لاحقاً فى برامج أخرى. وبالتالى لا يمكن الاعتماد عليه وحده.
So, what’s my conclusion, Lightroom CC vs Photomatix Pro? Which one to use?
In simple, I will use both. In those cases where I don’t need the flavored visual effects of Photomatix and no motion in the scene, then Lightroom HDR merge will be sufficient for me. When moving objects are there, or the Photomatix nice visual effects are favorable, then I might mix a Photomatix HDR version with another one from Lightroom to get the advantages of both routs. Although I’m getting later into a lot of digital blending processes where I don’t use HDR merge at all, HDR merge remains an effective and easy solution at many occasions.
إذاً ما هو الإستنتاج، لايت روم أم فوتوماتيكس؟ أي برنامج سأستخدم؟
ببساطة، سأستخدم كلا البرنامجين. ففي الحالات التى لا أحتاج فيها التأثيرات الفنية لبرنامج فوتوماتيكس ولا يوجد حركة بين الأجسام فى المشهد، سيكون برنامج لايت روم كافياً تماماً لعمل الدمج بين الصور وضبط خصائص الصورة النهائية. ولكن عندما تتواجد أجسام متحركة أو تكون لمسات فوتوماتيكس الفنية مرغوبة، سأستخدم كلا البرنامجين للحصول على جميع مزاياهم. ولاحقاً أقوم بدمج الصورتين الناتجتين فى برنامج فوتوشوب باستخدام تقنية Layer Mask للحصول على الصورة النهائية. وبالرغم من أننى حالياً أقوم بكثير من عمليات الدمج الرقمى للصور Digital Blending حيث لا أعتمد فيها على دمج HDR مطلقاً، فتيبقى تقنية HDR أسلوباً فعالاَ وسهلاً فى كثير من الحالات.
