


Planning Travel Photography starts by knowing the landmarks of the destination you are visiting, which will greatly help you get the most out of your photography trip. Would you imagine a Photographer visiting London without taking photos for Big Ben, London Eye or the Tower bridge? Of course not. Any photographer visiting such a famous city will most probably capture the Iconic Landmarks and places around the city. It’s one of the very early planning steps finding out where those Landmarks are located and how far they are from where you will be staying. And here comes the first benefit of knowing how to store these locations in your map and learn how to use them .
إن معرفتك بمعالم المكان الذي ستزوره سيساعدك كثيراً في الحصول على أقصى استفادة ممكنة من رحلة التصوير الفوتوغرافي. هل لك أن تتخيل مصوراً يزور مدينة لندن دون التقاط صوراً لساعة بيغ بن أو لندن آي أو تاور بريدج؟ بالطبع لا. فإن أي مصور سيقوم بزيارة تلك المدينة الشهيرة لابد وأنه سيلتقط صوراً للمعالم المتميزة في جميع أنحاء المدينة. في الواقع هذه أحد أولى خطوات التخطيط المبكرة للرحلة، فيجب معرفة أين تقع تلك المعالم الرئيسية وما مدى بعدها عن مكان إقامتك. وهنا تأتي الفائدة الأولى لمعرفة كيفية تخزين هذه المواقع في خريطتك الخاصة.
Photography Wishlist
Let’s do first things first. Start putting down a list of photos and compositions you wish to capture. I call this list of photos “The Easy Winners” because I don’t spend a lot of time thinking about them. These are the photos that you know when to capture, where to place the camera and probably how to process even before you travel. Simply collect these photos from well known photography sites like Smugmug, 500px, Tumbler, Flicker and so on. Segregate them by location in separate folders or albums on your phone’s photo gallery so you can easily access them offline later.
For example, when I was visiting The Tower Bridge or visiting the area around Big Ben, I had those photos prepared as a wish list. I wish I knew who were those photographers to mention them. Unfortunately I couldn’t find out so far.
قائمة مفضلات الصور
دعونا نبدأ بوضع قائمة من الصور والتكوينات التي ترغب في تصويرها. أطلق على هذه الصور “القائمة المضمونة”. فهذه هي الصور التي تعرف مسبقاً توقيت التقاطها، مكان وقوفك ومكان وضع الكاميرا وربما أيضاً تعرف مسبقاً كيفية معالجة الصورة لاحقاً حتى قبل أن تبدأ الرحلة بالفعل. يمكنك ببساطة جمع هذه الصور من مواقع التصوير المعروفة مثل Smugmug ، 500px، Tumbler، Flicker، وغيرهم. ثم قم بتصنيفها تبعاً لمكان الصورة في مجلدات أو ألبومات منفصلة على معرض الصور بهاتفك بحيث يمكنك الوصول إليها بسهولة لاحقاً.
على سبيل المثال، عندما كنت في زيارة لتاور بريدج أو في المنطقة المحيطة بساعة بيغ بن،كنت مستعداً بتلك الصور في قائمة مفضلاتي. كنت أتمنى لو أني أعرف من هم هؤلاء المصورين لذكر أسمائهم. للأسف لم أتمكن من معرفة من هم حتى الآن.


And here are my Easy Winners … Easy, right?
وها هي لقطاتي المضمونة … كما ترون فالأمر ليس صعباً، أليس كذلك؟


But be careful not to get stuck with only those shots. Those are just the beginning steps. You still need to push yourself to capture the place in your eyes. Here are few shots that I did not planned.
ولكن يجب أن تحذر من أن تكتفى فقط بتلك اللقطات.ليست هذه اللقطات سوى الخطوات الأولى فقط. فما زال هناك الكثير من اللقطات التي يلزم أن تلتقطها للمكان بنظرتك الخاصة. وأعرض هنا بعض اللقطات التي لم أكن قد خططت لها مسبقاً من أماكن مختلفة في المدينة.


Using Google Maps & Google Earth
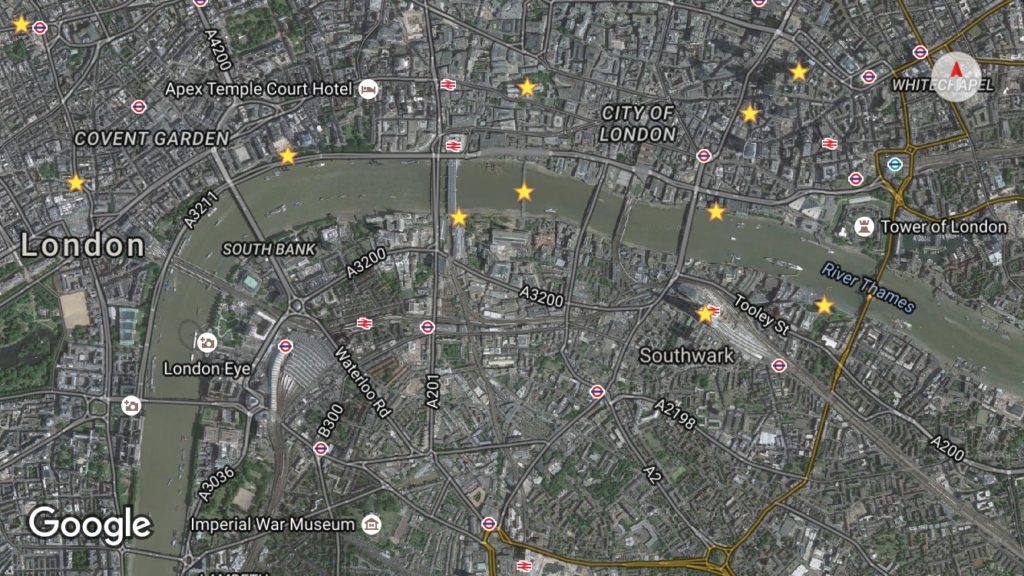
We can’t ignore how Google has made our lives easier. You only need to log into your Google account on your phone / tablet and start looking for the landmarks you want to photograph. With few simple clicks you got these places stored on your map. You also can add some notes to the stored location if you wish.
استخدام خرائط جوجل وجوجل إيرث
لا يمكننا أن نتجاهل كيف جعل جوجل حياتنا أسهل كثيراً. ما عليك سوى تقوم بتسجيل الدخول إلى حساب Google الخاص بك على هاتفك والبدء في البحث عن المعالم التى تخطط لتصويرها. مع القليل من الخطوات البسيطة حصلت على هذه الأماكن المخزنة على الخريطة. يمكنك أيضا إضافة بعض الملاحظات على المواقع التي قمت بتخزينها إذا كنت ترغب في ذلك.
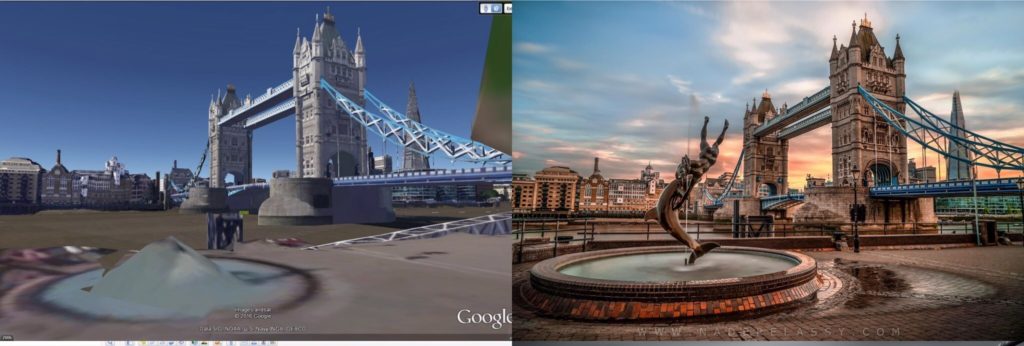
But things can go even deeper with Google. Amazingly in the desktop version of Google Earth you can literally plan your compositions for architectural, landscape and cityscape shots. Using the Street View and 3D Buildings options, I was able to prepare these compositions and many more even before I travel. These kind of preparations give you a very good sense of the places and most probably eliminate the likelihood of unpleasant surprises. Here are few samples of what I have prepared and the final photos captured.
ولكن يمكنك أن تجعل الأمور أكثر عمقاً مع جوجل. فإذا استخدمت إصدار الكمبيوتر من جوجل إيرث سيدهشك كيف يمكن التخطيط لالتقاط تكوينك الخاص للقطات المعمارية والمناظر الطبيعية وصور المدينة. باستخدام إمكانية مشاهدة المباني ثلاثية الأبعاد وخاصية ستريت فيو استطعت تجميع وتخيل هذه اللقطات وغيرها الكثير حتى قبل أسافر. هذه الاستعدادات تعطيك شعوراً جيداً للغاية بالأماكن التي ستزورها. وعلى الارجح ستتجنب الكثير من المفاجآت الغير سارة. وفيما يلي بعض الأمثلة التي أعددتها مسبقاً مقارنةً بالصور النهائية التي حصلت عليها.


Daily Photography Plan
Having a previously set plan will save you a lot of time. And that will definitely help you to estimate what lenses, tripod, and other equipment to take every day. For example, you don’t want to carry a heavy tripod and mounting brackets to a place where you are not allowed to use them. Also planning transportation, entry tickets, knowing working hours, weather, sunrise and sunset will significantly save you time and money.
For example, I planned to visit the Museum of Natural History at the noon time to avoid the noon time sun outdoors. Because I knew Tripods are not allowed in the Museum, I planned a visit to the St. James Park in the morning as I won’t need the tripod as well while photographing flowers, birds and running squirrels. The plan was also to spend the golden and blue hours time in the Tower Bridge Area. So in the way back from the Museum to the Tower Bridge area I passed by the Hotel for some rest, and took my tripod & ND filter for the next adventure.
خطة التصوير اليومية
إذا التزمت بوضع خطة يومية مسبقة ستوفر الكثير من الوقت والجهد خلال الرحلة. سوف تساعدك الخطة بالتأكيد في تحديد أي العدسات، ترايبود، وما المعدات الأخرى التي ستحتاجها في كل يوم تبعاً لطبيعة الأماكن التي ستزورها في هذا اليوم. فعلى سبيل المثال، فأنت بالطبع لا تريد أن تحمل ترايبود ثقيل الوزن وتذهب به إلى مكان لا يسمح لك فيه باستخدام الترايبود. يمكنك أيضاً أن تخطط كيفية التنقل بين الأماكن وأن تحجز مسبقاً تذاكر الدخول إذا رغبت. أيضاً معرفتك المسبقة بساعات العمل في هذه الأماكن، وتوقعات الطقس، ومواعيد واتجاهات شروق الشمس وغروبها سيوفر لك كثيراً من الوقت والمال.
على سبيل المثال، كنت قد خططت مسبقاً لزيارة متحف التاريخ الطبيعي بلندن في وقت الظهيرة حتى أتجنب التصوير الخارجى تحت شمس الظهيرة. ولأنني كنت أعرف مسبقاً أن استخدام الترايبود غير مسموح في المتحف، فقد خططت زيارة أخرى لحديقة سانت جيمس بارك في الصباح قبل المحف حيث أنني لن أحتاج الترايبود في الحديقة بينما أقوم بتصوير الزهور والطيور والسناجب وهي تركض بين الأشجار. واستكمالاً للخطة أيضا رتبت لقضاء الساعات ذهبية والزرقاء من نهاية اليوم في منطقة تاور بريدج. فمررت بالفندق للراحةحيث أنه في طريق العودة من المتحف إلى منطقة تاور بريدج، وقمت وقتها بأخذ الترايبود وفلتر ND استعداداً للمغامرة الفوتوغرافية التالية.


