


One of the nice tours I had in Kuala Lumpur ended with having dinner in KLCC mall. I had to take this shot very quickly as the mall shops were about to close, which would make the shot very boring. Also, The shot was handheld for the same reason. KLCC is a mid sized shopping mall located in between the great Twin Towers of Petronas.
واحدة من الجولات الجميلة في كوالالمبور والتى انتهت بتناول وجبة العشاء في مجمع KLCC. اضطررت الى اتخاذ هذه اللقطة بسرعة كبيرة حيث كانت المحلات التجارية فى المركز التجاري على وشك الإغلاق، مما كان من شأنه أن يجعل اللقطة مملة جدا. أيضا، تم أخذ اللقطة والكاميرا محمولة يدويا لنفس السبب. KLCC هو مركز تجاري متوسط الحجم يقع بين البرجين التوأمين بتروناس.
EXIF: F4 – 1/20 s – 10 mm – ISO 100
The shot was a Vertorama (vertical panorama) formed out of 3 shots taken vertically in Landscape mode. Here are the original shots.
الصورة عبارة عن بانوراما عمودية تشكلت من 3 لقطات اتخذت عموديا في وضع أفقي. وفى الأسفل اللقطات الأصلية.
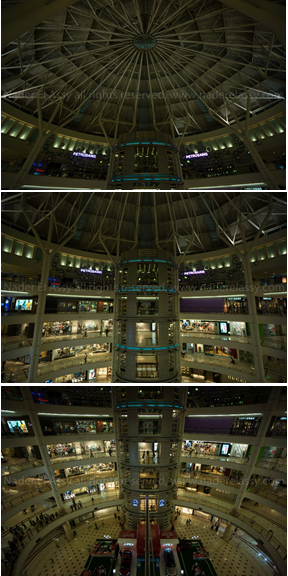
The photos were first processed independently processed in Adobe Lightroom to adjust the lighting, white balance and tones. As you see, the original photos were underexposed because I couldn’t slow down the shutter anymore to keep the photo sharp and stable while shooting handheld. But did it really matter? I think it’s clear how the dark areas were cleverly recovered producing good final lightened photos. I give that credit to the good Dynamic Range of the Sony sensor in the NEX-7 and also to Adobe Lightroom which became very useful in extracting the hidden lights in the RAW files.
تم معالجة الصور الاصلية بشكل مستقل في برنامج أدوبي لايت روم لضبط الإضاءة، توازن الأبيض ودرجات الالوان. وكما ترون،كانت الصور الأصلية القليلة التعرض لأنني لم أتمكن من أن أبطئ الغالق أكثر من هذا للحفاظ على الصورة حادة ومستقرة بكاميرا محمولة يدويا. ولكنه لم يهم حقا؟ أعتقد أنه من الواضح كيف تم استرجاع الإضاءة فى المناطق المظلمة بذكاء. أعطي هذا الفضل إلى المدى الديناميكي الجيد لسينسور الكاميرا سوني NEX-7 وأيضا لبرنامج أدوبي لايت روم الذي أصبح فعال جدا في استخراج الأضواء المختفية في الملفات RAW الأصلية.
Then, exported the three photos to Adobe Photoshop as Panorama. There, Photoshop smartly merged the three shots producing one big accurate photo, but not aligned enough. Usually you get extremely distorted results when you merge photos into panoramas. And here comes the Adaptive Wide Angle filter rule (read my review about the filter HERE). That magical filter straightens the lines back to normal based on your personal preferences. Last steps were about sharpening the image slightly and very few touches.
ثم قمت بتصدير الصور الثلاث لبرنامج أدوبي فوتوشوب لدمجهم كبانوراما. و هناك، فوتوشوب قام بذكاء بدمج الصور الثلاث منتجاً صورة واحدة دقيقة وكبيرة الحجم، ولكن استقامة الصورة ليست بما فيه الكفاية. عادة ما تحصل على نتائج مشوهة للغاية عند دمج الصور كبانوراما. وهنا يأتي دور فلتر Adaptive Wide Angle (اقرأ موضوعى حول هذا الفلتر من هنا). هذا الفلتر السحري يعدل الخطوط المنبعجة ويعيدها إلى طبيعتها على أساس تفضيلاتك الشخصية. كانت الخطوات الأخيرة عبارة عن زيادة حدة الصورة قليلا وعدد قليل جدا من اللمسات الإضافية.
