


Photographers who are used to the ultra-wide angle lenses, multiple shots Panorama or Architectural photography probably know and love this filter. In short, this filter allows you to straighten curved lines, when they were originally straight. The filter also gives you the option to identify vertical and horizontal lines in the photo. The smart part of that process is how the filter handles adjusting the remaining areas of the photos to lean with your choices.
المصورين الذين تعودوا على استخدام العدسات ذات الزاوية الواسعة، أو يقومون بعمل صور البانوراما متعددة الصور أو مصورين الصور المعمارية ربما يعرفون، بل ويعشقون هذا الفلتر. باختصار، يسمح هذا الفلتر بتصحيح الخطوط المنحنية والمنبعجة فى الصورة، إذا كانت تلك الخطوط مستقيمة فى الواقع. يعطي لك الفلتر أيضا الخيار لتحديد الخطوط الرأسية والأفقية في الصورة. الجزء الذكي فى هذه العملية هى كيف يقوم هذا الفلتر بضبط المناطق المتبقية من الصورة والتكيف مع خياراتك.
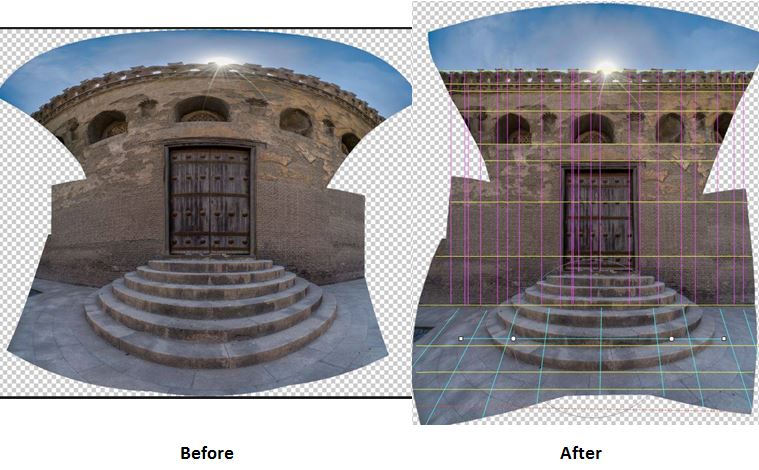
In the above example, it was a merge of 6 frames captured as panorama. And it was a real challenge to align all these straight lines of the bricks. As I said, the filter was very smart to identify how that semicircular stairway should look after I applied my lines straightness choices.
في المثال بالأعلى Photo 1، تم دمج 6 صور بأسلوب البانوراما. وكان تحديا حقيقيا ان يتم الجمع بين جميع هذه الخطوط المستقيمة من الطوب. وكما قلت، كان الفلتر الذكي جداً فى تحديد كيف ينبغي أن يظهر ذلك السلم النصف دائري بعد طبقت خياراتي لاستعادة استقامة الخطوط.
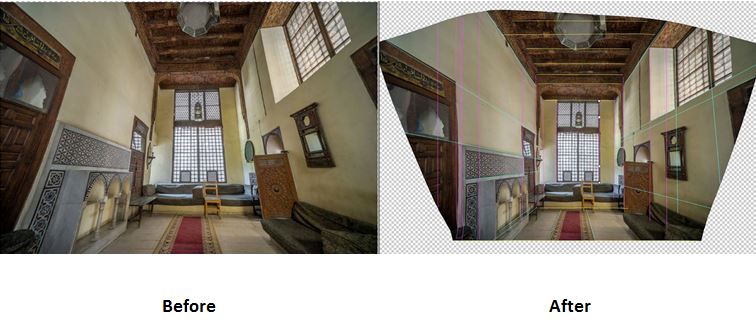
Here is another example where it was a single photo. This was captured with the 10 – 18 mm ultra-wide angle lens. This photo was a bit easier than the above one as the main lines were not that many. But still, the filter is very fast and accurate in capturing what you are thinking about.
هنا مثال آخر Photo 2 حيث كانت صورة واحدة. تم تصويرها باستخدام عدسة ذات زاوية واسعة جداً 10-18 ملم. هذه الصورة كانت أسهل قليلاً من الصورة الأولى حيث لم تكن الخطوط الرئيسية لم تكن كثيرة. ولكن لا يزال أداء الفلتر سريع ودقيق جداً فى تطبيق المعالجة التى تريدها.
You can find this filter in Photoshop under the Filter Menu. And it’s a basic filter that comes normally with the software, no external downloads are needed.
يمكنك العثور على هذا الفلتر في Photoshop تحت القائمة “Filter”. وهو من الفلاتر الأساسية التي تأتي عادة مع البرامج، وليس هناك حاجة إلى استخدام برامج خارجية.
![Photo [3] Adaptive wide angle filter](http://www.naderelassy.com/wp-content/uploads/2014/09/Adaptive-wide-angle.png)
I’m sure you will enjoy this filter too. try it and leave me a comment with your impression.
أنا على ثقة من أنكم ستستمتعون باستخدام هذا الفلتر فى صوركم أيضا. قم بتجربته واترك لى رأيك وتعليقك.

2 thoughts on “Experimenting “Adaptive Wide Angle” Filter in Adobe Photoshop”